
Hand embossing, also called blind embossing, is a simple technique that yields elegant results. I referred to this technique in my last post on McMansions where you can see another example of the medium.
I became interested in embossing 20 something years ago when I came across and ad in the back of a magazine for a pamphlet called Hand Embossing by Pat Condron. That particular pamphlet discussed a number of techniques and had a decent amount of typeface styles to practice embossing if typeface was your thing. I tried all the techniques, though I avoided the typeface aspect. Being of short attention span I settled on what I considered to be the easiest technique, developing even more short cuts over the years to go with my increasingly shorter attention span.
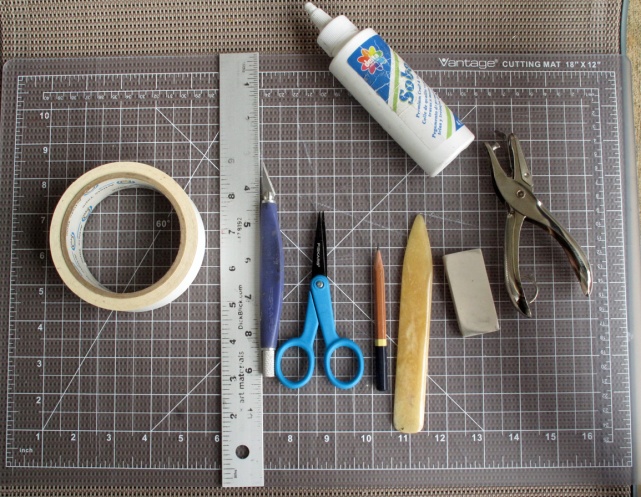
So to get started, it is good to have some basic materials. Absolutely essential are paper (see list below), card stock, glue, scissors, and a scoring tool (such as the back of a paintbrush). However, if you really get into embossing obtaining a few more items makes for a better experience:
- Cutting mat
- Drafting tape
- White glue
- Xacto style knife & blades
- Ruler or straight edge
- Small sharp scissors
- Pencils
- Eraser
- Hole punch
- Paper scoring tool
- Matte medium & small paint brush
- Heavyweight card stock (such as bristol board)
- Paper (lightweight high quality papers look the best such as Rives light sheet, Strathmore 500 series drawing papers)
- Large spoon
After you decide on an image, when designing the template consider which areas may look good raised and which ones recessed. Since a picture is worth a thousand words, I am just going to post the plate from my last post below and you can also take another look at the plate at the top of this post.
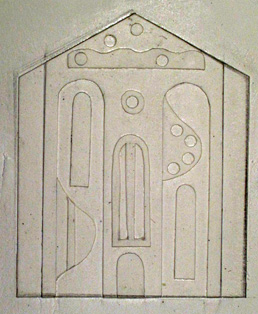
Whether you draw your design directly on the card stock or draw onto tracing paper and transfer your design is completely up to you. I go right for the card stock, figuring that is why erasers were invented, and, since the plate is not the finished piece, who cares if it isn’t pretty?
Ok so now you have drawn and cut out your design. The next step is to glue it onto another piece of card stock. Make sure the card stock you use to back your design is large enough that your paper fits completely on the plate. You do not want any of the paper hanging off the edge of the plate because you do not want the finished embossed piece to get bent in a way that will detract from the subtle folds and bends of the actual artwork.
Do not over glue because your card stock will warp. You can also put a heavy book on top of the plate while it dries to help keep it flat. While the glue is drying, get your paper for your finished pieces ready, making them all the same size. When the plate is dry, put a piece of your paper on top of the plate and draw guide lines so you can easily place your paper in the same spot each time you go to emboss.
This next part is optional but I highly recommend it: give the plate a coating with matte medium, making sure not to get any of the medium globbed up in the nooks and crannies of the plate details. It not only keeps the plate longer, but I think it makes the process of scoring a little easier. You can try it both ways but it is a step I do not avoid. Of course, this should dry for several hours.
So the plate is dry and you are ready to emboss. This first piece will serve as a practice piece and a reference guide/map. Make sure your surface, your hands, and your tools are clean. Lay your first sheet of paper on the plate at the guidelines your drew. Attach a small piece of drafting tape so the paper doesn’t move. Gently rub the paper with the back of a large spoon to get the basic shape of the overall design.
Take your paper scoring tool and, using the tip, run the tool slowly along any straight edges. Start with straight edges because they are the easiest. Then go to any rounded edges and slowly run the tool against those edges with the point of the tool. If it makes it easier for you to turn your plate as you work, then do so. When you feel you have finished scoring every aspect of your design gently lift off the paper and examine your finished piece. Since this is a practice piece, if you missed anything, try to align the paper back on your plate and go over that area you missed. Afterwards, whether you missed an area or not, use this piece as a map/guide so you know what areas need scoring for the rest of the edition of prints. Having this map/guide eliminates any guesswork hereafter.

Above is one of the first embossed pieces I made, from 1993. I still have this piece so you can see how long these images last. There is one difference in this piece and that is the paper color and stock. This was done on Arches Cover Stock, that I put a wash of paint on first. I believe I did most of these as a dry embossing, as described above, but I feel I may have done some as a “damp” embossing as well. The difference is that the paper is slightly damp when you score it. This may be useful for a thicker paper stock (such as Arches Cover) but it is not necessary and, frankly, I do not like it because the paper stretches. However, if you do choose a damp paper method, it is then absolutely essential that you treat your plate with matte medium to keep it from warping.
If you are going to sign your finished work, it is best to do so on the back with pencil because any mark detracts from the overall subtle design. So that is embossing in a nutshell.

Thanks for these instructions! I’ve been thinking about making an embossing plate and now I know more about how.
LikeLiked by 1 person
I have lots of cardstock Alice if you need any.
LikeLike
very interesting. you explain things well. ________________________________
LikeLiked by 1 person
I try. Either that or I have you fooled
LikeLike
This is so clear and well-explained. I’m going to try this. Thanks for taking the time to pass on the information.
LikeLiked by 1 person
I am glad Claudia. I was inspired to write it because you had made a mention of wanting to hear more about it. I am wondering if you could emboss directly from one of your tiles?
LikeLike