White line woodblock printing is a fun alternative to the traditional woodblock print. In traditional woodcut, the shapes are often emphasized with dark contour lines but with this method of woodblock printing, the contour lines are white. The white line technique originated in Provincetown, MA in the early 20th century. You can read about the history of the technique here.

Above is the block I carved. This photo was taken after the block was printed, so it shows the contrast of the contour lines better. Since the block originally is the color of raw wood, the contrast of the carved line from the rest of the block would not show as well.
About three years ago, I took an on-line workshop in this technique through the Smithsonian Associates. The course was taught by Sue Fierston. Though there are several people online that demonstrate this technique, Sue’s approach includes a helpful addition which I will explain.

The image above shows how color is applies for this method. Instead of printing inks, watercolors are used. Watercolor (and often sumi ink) are traditional in woodblock printing in the Eastern tradition where as Western woodblock printing uses relief printing ink. Sue suggested coating a light mist of water and brushing a small amount of rice paste onto the block before applying the pigment the first time. This helps the pigment release better and also adds richness to the color. These prints are a little more labor intensive than traditional one color woodblock printing in that you have to work quickly so the pigment does not dry on the block. Also, the pigment has to be applied a few times to build up color; however, the addition of the rice paste, decreases the amount of times you have to apply pigment. Above is the results of my print after a few applications of color.
The print below is an example that did not turn out well because the paper (Rives Heavy sheet) is too textured which made it difficult to get a smooth coating of pigment.

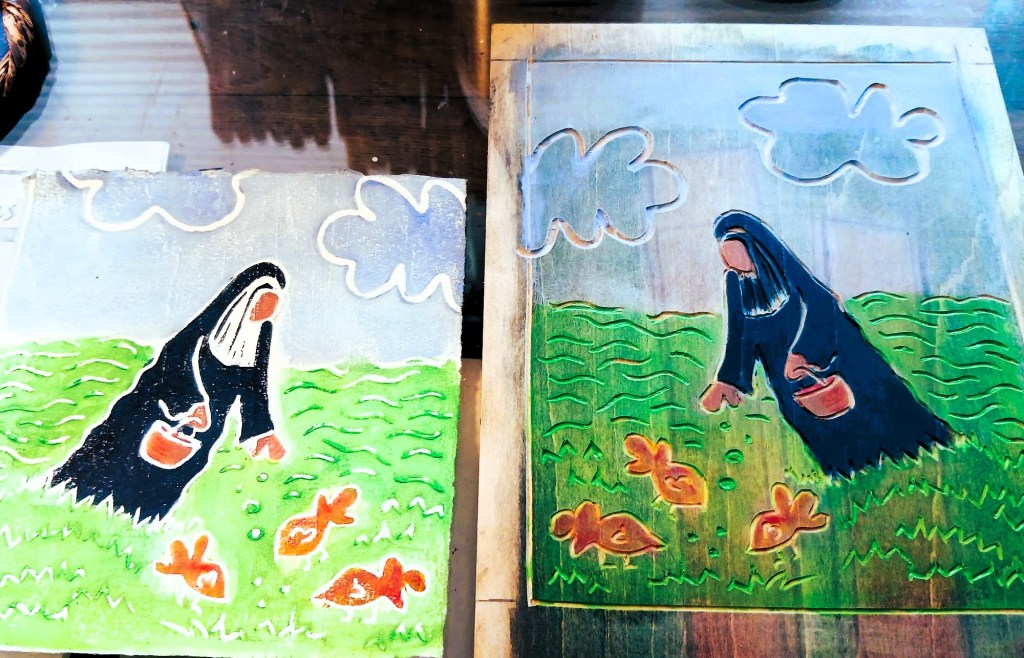
But below is a fairly successful attempt so this is my first decent ‘proof’. Notice that only part of the sky is printed. I used a small sheet of a different paper (Rives light sheet) to see how this paper worked. I feel this is a much better paper for this technique. The print is on the left and the block is on the right.
Other papers suitable for woodblock printing (in general) are various Eastern (a.k.a. ‘rice’) papers like mulberry or masa. I will also give this a try on some mulberry paper to see how that turns out.

Wonderful little masterclass on how to do it! The images look great on the computer (as opposed to phone). Hope to see more in this series!
Anders
LikeLiked by 1 person
I probably will work a bit more in this medium but not sure about additional nun images. Although you never know.
LikeLike
Lovely woodcut! I took Sue’s class and the second one she did in Smithsonian. Maybe we were in the same class. I LOVE the look of these prints. You are inspiring me to make a woodcut from some of my Ireland drawings.
LikeLiked by 1 person
Hi Michele, Yes perhaps we were. I took two classes in early December of (I think) 2022. I have been in touch with her to get a few reminders of things. I am interested to see how your prints turn out if you embark on any. Have fun on the rest of your trip.
LikeLike
I forgot about the rice paste. Is it the Japanese stuff in the green tube that I forgot why I have it? I’ll see if I still have my notes from those classes. I know I do, but not sure where
LikeLike
Well my paste is called Nori Paste (which is a brand name) and is in a yellow jar. Basically you want rice paste. I don’t know what I did with my notes!
LikeLike