


Three examples of transfer prints
Recently I added a few new prints (see above) to my Etsy site that were made via a transfer method. I have been recently thinking about ways to print without a press because so many of the places I taught did not have a press and, in the spring, I will be teaching such a workshop again so I wanted to get back in the swing a bit.
The properties of a transfer print are very different than most printmaking techniques. The marks made are very velvety, sort of more like a charcoal drawing. If you are looking for clean, crisp lines, this is not the method to use.
Materials for a transfer print can be as bare bones as a stamp pad, paper, and pencil. But if you want a little more space for your image I suggest using block printing ink rolled out. Here is what you need:
- Block printing ink (I prefer permanent ink)
- Paper
- An inking slab such as an old baking sheet or a piece of glass or plexiglass
- A brayer
- Pencil
- Cellophane tape or drafting tape
- A fine line marker
- Watercolor and brush are optional
If you are using a piece of glass please make sure you tape off the edges to avoid cutting yourself. You can see in my photographs below that my glass plate is taped. A heavy tape is best such as duct tape or white artist tape.
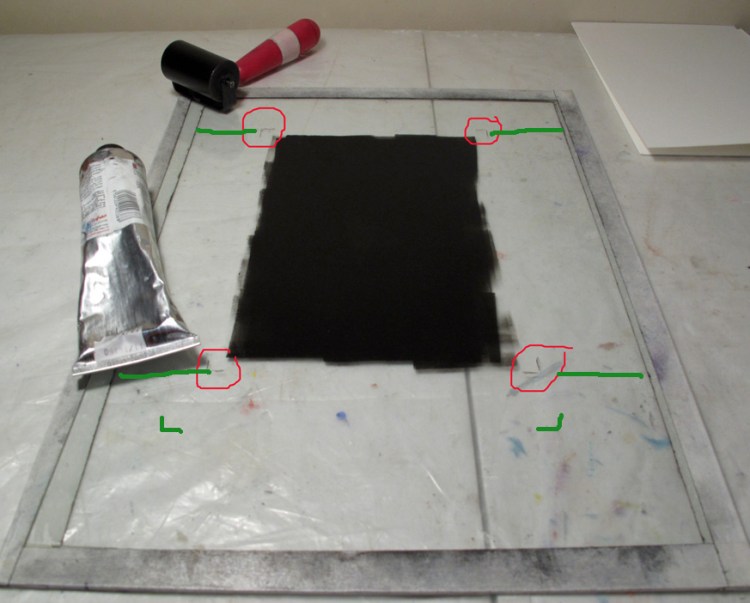
Decide how big your image will be. Will is be the size of the whole sheet of paper or do you want the image set in the center of the paper with a clean-ish margin around the image? Keep in mind if you want the latter of the two options you will not get a pristine clean margin like you would with other printmaking techniques but it will have the same effect of setting off the image.
I have marked my plate in the photo above to show both options. Circled in the red marks (this is done via photoshop, it is not on my actual printing plate) there are tic marks made with a marker. This mark is where the ink will go. You do not want to cover the whole plate with ink because it is not only wasteful but will make a mess. This patch of ink is the same size as a small piece of paper I will be using, so the image will cover the whole sheet of paper, no margins. The second marks I made in green (again via photoshop) are for if you want to use a larger sheet of paper with a margin around the image as described above. What you would do is figure out approximately where you want your image to be in relation of the paper (usually in the center). Extend the tic marks out to the edge of your inking sheet so you have indicators as to where the ink is once you put the paper down over it. You will also see a green line on the bottom of the plate, this is also an indicator as to where to lay the paper. With these indicators, you should be able to get your paper pretty close to getting the image in the center of the paper.
For the purpose of this demonstration, I am using a small sheet of paper that covers the entire ink patch (see below). Place the paper down and put some tape on two of the opposite corners. I always prefer drafting tape because it does not rip the paper. However, if you are practicing, use whatever you have handy such as cellophane tape.
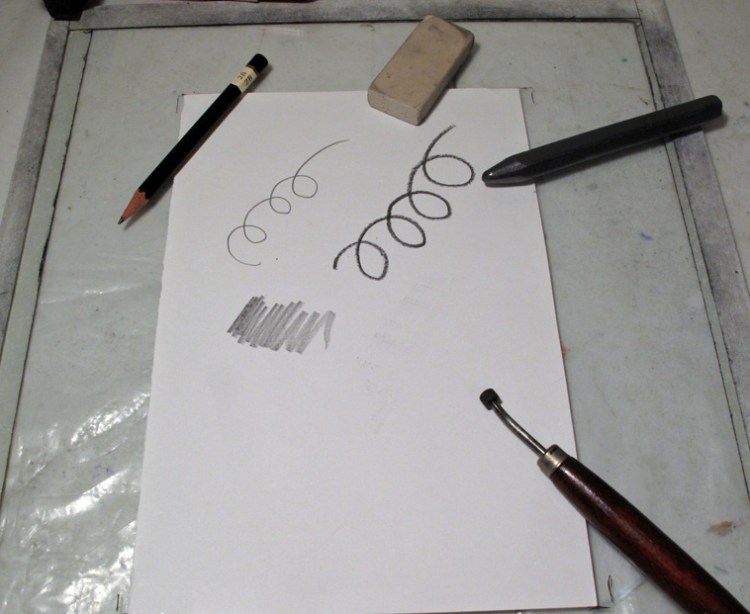
Now you simply draw your design with a pencil. Above I have made marks with a variety of tools: a pencil, a thick graphite stick, the end of an erase, and my fingers. You can also use a pencil on the side, rather than the point, to get a thicker mark. The odd looking tool in the lower right corner is something called a roulette wheel, which is a specialized tool used in intaglio printing. But perhaps you have a pie cutting wheel or some other rolling implement to experiment with; have fun!

Going clockwise from top right, here are the results from the various tools: pencil, roulette wheel, dragged finger, finger print, roulette wheel used a different way, fat graphite stick, stamping with end of a plastic eraser. Keep in mind how hard you press will effect the darkness or lightness of the mark. The finger prints were also shown as a warning, whatever you do, do not learn on your paper when drawing because those marks will be picked up. That is why it is a good idea to anchor your paper with tape. If you are using permanent ink, when the print is dry you can go over areas with watercolor.


Paper on ink pad (left), resulting print (right)
So for the quick and easy method, above is the stamp pad set up. Again, I like permanent ink so I use Ranger Ink Pads. With this method, you are limited to the size of the stamp pad. Simply lay your paper down on the pad and draw. Presto!

Thanks, Diane, This is always fun. Hope everyone tries it, and hope that all iswell in your house and home. Best, Sheldon
LikeLike
Thank you Sheldon. Let’s try to chat soon. Xo
LikeLike
Another great idea and your explanation is so clear. I like the simplicity of the materials. I’d like to try this with painted papers.
LikeLiked by 1 person
It should work just fine as long as the paint is not too thick. In this case you may want to go with a water based ink.
LikeLiked by 1 person
I’ll do some experimenting. I generally make the painted papers with a pretty thin layer of paint so it sounds possible to try this. The technique sounds like it creates such great effects and I love what I see in your photos.
LikeLike